
Miniature photography for beginners part 1: What you need
Taking photos of your miniatures is almost a hobby in itself and the first steps into that can be daunting. Hopefully this guide will help beginners start their journey down another rabbit hole.

I quite often get asked how I take my photos and while the technique is fairly simple some of the gear I use may not be. I have the privilege of working as a videographer so I have access to quite a lot of gear like lights, cameras and software. That’s obviously something not everyone has and I understand it can be quite off-putting to feel you have to buy a bunch of stuff just to take photos of an already quite expensive hobby. So in this article I will walk you through the steps of taking a nice photo of your miniatures but only use stuff that is commonly found at home or can be acquired without having to use too much money from the hobby budget.
What gear do I need?
The main piece of equipment here will be your smartphone and you don’t need the latest model with quadrupel lenses and an 8k screen. I’ve used an iPhone SE from 2020 for all the photos here and it works just fine. It isn’t a proper camera though which is most notable because you will not be able to achieve the same depth of field as with a camera. We’ll try to get around this as best as we can though. And if you have a camera, even if it’s just an old point and shoot-camera, you can always try replacing the smartphone in this guide with that.
You also need something to hold the phone as I don’t recommend just using your hands. I have a fairly simple no-brand holder but there are probably as many variants of these as there are phones and any of them will probably do. If you don’t have a holder just prop up the phone with something heavy or sturdy like perhaps a glass or a can.
The second most important piece of equipment is some kind of light. The qualities you are looking for with your light is that it should be strong, the more lumen it can produce the better. The second thing you need is for it to be as flexible as possible so you can position it as you like. I used two lights for our example, one was my bedside lamp which has a flexible neck and the other is a classic desk light. There are obviously lots of different lights and most should be fine. You might even be able to use a flashlight but something like a ceiling light wont do as we need to be able to aim the light properly. You will need at least two lights but if you have more that’s even better.
A helpful thing to have around is a couple of books. I usually place my scene on these so I get off the table a bit. They are also useful for holding things in the back or leaning terrain against. Extra useful are some of the thin Osprey books as you can add just a little bit of height with each book.
The miniatures and terrain
Obviously you'll need something to photo and my guess is it will be some of your miniatures. Feel free to use what you have in your collection but for me I have found that units of miniatures work better than single or small groups of miniatures. Some small pieces of terrain are also useful to have at hand. I have a couple of trees, some moulded railway rocks, some foliage, twigs, a few houses and so on. A few of these I have bought especially for photos but most of it is just normal wargames terrain that I use in my games.
Another important piece of equipment that is needed is a foreground (more about why that’s important in part 2). This can be something as simple as your gaming mat or some flock and foliage. What I have found to be very useful though are diorama scenic mats. These are used by scale modellers when building dioramas and there are several manufacturers like AMMO by Mig, Model Scene, Noch, Lars op’t Hof and many more. You could probably even make something like this for yourself, it’s basically just a big base.
You also need some kind of backdrop that will cover the whole image, so it needs to be quite big. The easiest thing to do is to find a suitable image of a sky or a landscape online. You can search and find free high resolution images over at Pexels or Unsplash. You can also download the backgrounds I’ve made which you can find in my Resources. These then need to be printed on A3-size paper.
Last but not least you need a fairly large flat surface. A table works best but I guess you could use your floor.
What software do I need?
While your phone's camera app is probably fine it doesn’t offer as much control over the settings as we would like. That’s why I recommend using Adobe’s Lightroom app since it has both a good camera and some nice editing tools. It’s available on both iOS and Android phones and it’s free as long as you register an account with Adobe (a few features are not available in the free version but we will not be using those anyway).
Once installed, open up the app, press Lightroom in the bottom menu and then press the camera icon in the bottom right. I have set up my app so it looks like below as these are some features that will be useful.
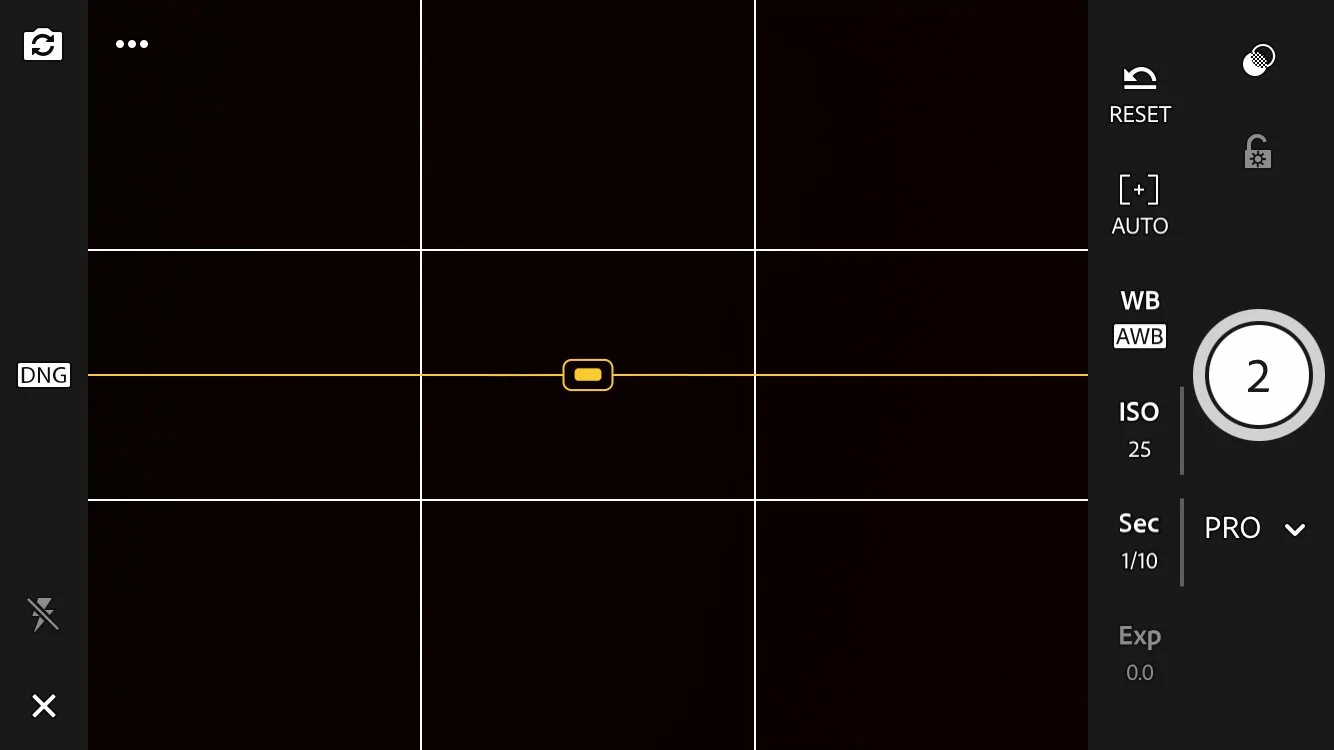
To begin with press where it says Auto and select Professional instead. You now get a number of new buttons in the right hand of the screen. Manual focus ( [+] ) and White Balance (WB) you can leave on auto for now. Set the ISO as low as possible, 25. Shutter Speed (Sec) you can set to 1/10 for now. Exposure Compensation (Exp) should be greyed out because we have set our ISO to 25 and we won’t be using this.
Next press the three white dots in the upper left corner. Press the little grid pattern and choose thirds, this is to help while composing our photo. Also press the leveller (furthest to the right) as this will help us get a straight and level photo. Then press the timer and choose a suitable time, 2 seconds is usually enough. A timer will help us to have the phone perfectly still while taking the photo as even small movements can create a blurry image. Finally you can choose the aspect ratio of the photo. It’s a good idea to keep this at 4:3 to get as big a photo as we can. Farthest to the left you can also choose file format, choose DNG as we will edit our photos later and then export JPEGs. And finally, turn off the flash, we will not need that. This won’t be a full tutorial of the Lightroom App so if you wish to know more I recommend this very comprehensive guide.
Another useful app is AfterFocus which will help us get a very basic background blur. It seems to be free on Android but costs a little bit on iOS (that’s what I get for using Apple-products I guess). There are probably other similar apps out there but this seemed to do the job fairly well.
If you have any questions please leave a comment below and I’ll try to answer as best I can. In the next part we will be looking at how to set the scene and how to take the photo itself.
Don't miss the other parts of the series

Part 2: Taking the photo
Basic theory, how to set up your shot and build you scene.

Part 3: Editing the photo
Time to finalize the image for publication.